A standard approach for creating forms in Dynamics AX
is to create and store form objects in AOT. This ensures system
performance and a high level of complexity. But in a number of cases, it
is required to have forms created dynamically. Looking at the standard
Dynamics AX application, we can see that application objects like the Table browser form, various lookups, or dialogs are built dynamically.
In this recipe, we will
create a dynamic form. To show how flexible it can be, we will replicate
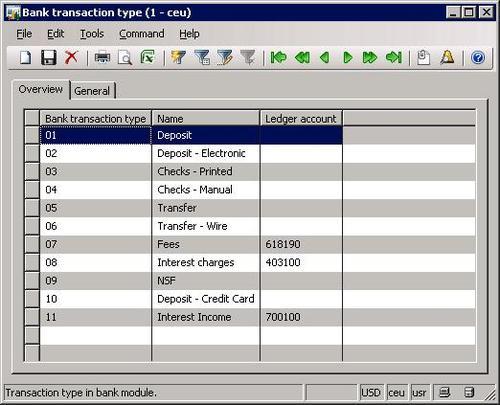
the layout of the existing transaction type form in the Bank module. It can be opened from Bank | Setup | Bank transaction type.
How to do it...
1. In AOT, create a new class called BankTransTypeDynamic with the following code:
static void main(Args _args)

{
DictTable dictTable;
Form form;
FormBuildDesign design;
FormBuildDataSource ds;
FormBuildTabControl tab;
FormBuildTabPageControl tp1;
FormBuildTabPageControl tp2;
FormBuildGridControl grid;
FormBuildGroupControl grp1;
FormBuildGroupControl grp2;
FormBuildGroupControl grp3;
Args args;
FormRun formRun;
;
dictTable = new DictTable(tablenum(BankTransType));
form = new Form();
form.name("BankTransTypeDynamic");
ds = form.addDataSource(dictTable.name());
ds.table(dictTable.id());
design = form.addDesign('design');
design.caption("Bank transaction type");
tab = design.addControl(FormControlType::Tab, "Tab");
tab.widthMode(FormWidth::ColumnWidth);
tab.heightMode(FormHeight::ColumnHeight);
tp1 = tab.addControl(FormControlType::TabPage, "Tp1");
tp1.caption("Overview");
tp2 = tab.addControl(FormControlType::TabPage, "Tp2");
tp2.caption("General");
grid = tp1.addControl(FormControlType::Grid, "Grid");
grid.dataSource(ds.name());
grid.widthMode(FormWidth::ColumnWidth);
grid.heightMode(FormHeight::ColumnHeight);
grid.addDataField(
ds.id(),
fieldnum(BankTransType, BankTransType));
grid.addDataField(
ds.id(),
fieldnum(BankTransType, Name));
grid.addDataField(
ds.id(),
dynamics formdynamics formbuilding, stepsfieldnum(BankTransType, LedgerAccountNum));
grp1 = tp2.addControl(FormControlType::Group, "Grp1");
grp1.dataSource(ds.id());
grp1.autoDataGroup(true);
grp1.dataGroup(
tablefieldgroupstr(BankTransType, Identification));
grp2 = tp2.addControl(FormControlType::Group, "Grp2");
grp2.dataSource(ds.id());
grp2.autoDataGroup(true);
grp2.dataGroup(tablefieldgroupstr(BankTransType, Name));
grp3 = tp2.addControl(FormControlType::Group, "Grp3");
grp3.dataSource(ds.id());
grp3.autoDataGroup(true);
grp3.dataGroup(tablefieldgroupstr(BankTransType, Ledger));
args = new Args();
args.object(form);
formRun = classfactory.formRunClass(args);
formRun.init();
formRun.run();
formRun.detach();
}
2. To test the form, run the class. Notice that the form is very much similar to the one in Bank | Setup | Bank transaction type:
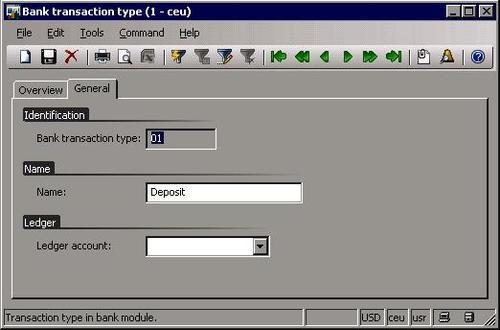
3. Click on the General tab page to display additional information:
How it works...
We start the code with declaring variables. Note that most of them begin with FormBuild,
which is a set of application classes used for building dynamic
controls. Each of those types corresponds to the control types manually
used when building forms in AOT.
Right after the variable declaration, we create a dictTable object based on the BankTransType table. We will reuse this object later a number of times.
Next, we create a form object and assign a name by calling:
form = new Form();
form.name("BankTransTypeDynamic");
The form should have a data source, so we add one by calling addDataSource() on the form object:
ds = form.addDataSource(dictTable.name());
ds.table(dictTable.id());
Every form has a design; so does ours:
design = form.addDesign('design');
design.caption("Bank transaction type");
Once the design is ready, we can start adding controls. First, we add a tab control by automatically expanding width and height:
tab = design.addControl(FormControlType::Tab, "Tab");
tab.widthMode(FormWidth::ColumnWidth);
tab.heightMode(FormHeight::ColumnHeight);
Then we add two tab pages, Overview and General:
tp1 = tab.addControl(FormControlType::TabPage, "Tp1");
tp1.caption("Overview");
tp2 = tab.addControl(FormControlType::TabPage, "Tp2");
tp2.caption("General");
The first tab page contains a grid pointing to the data source and automatically expanding height and width:
grid = tp1.addControl(FormControlType::Grid, "Grid");
grid.dataSource(ds.name());
grid.widthMode(FormWidth::ColumnWidth);
grid.heightMode(FormHeight::ColumnHeight);
We add three controls pointing to relevant table fields by calling addDataField() on grid:
grid.addDataField(
ds.id(),
fieldnum(BankTransType, BankTransType));
grid.addDataField(
ds.id(),
fieldnum(BankTransType, Name));
grid.addDataField(
ds.id(),
fieldnum(BankTransType, LedgerAccountNum));
The second tab page contains three groups, which we add by addControl() with the first argument FormControlType::Group. Here, we save some time and code by making those groups automatic by calling autoDataGroup() with true:
Group 1:
grp1 = tp2.addControl(FormControlType::Group, "Grp1");
grp1.dataSource(ds.id());
grp1.autoDataGroup(true);
grp1.dataGroup(
tablefieldgroupstr(BankTransType, Identification));
Group 2:
grp2 = tp2.addControl(FormControlType::Group, "Grp2");
grp2.dataSource(ds.id());
grp2.autoDataGroup(true);
grp2.dataGroup(tablefieldgroupstr(BankTransType, Name));
Group 3:
grp3 = tp2.addControl(FormControlType::Group, "Grp3");
grp3.dataSource(ds.id());
grp3.autoDataGroup(true);
grp3.dataGroup(tablefieldgroupstr(BankTransType, Ledger));
The last lines of code initialize and run the form.